Solar powered ACARS/VDL and ADSB station

Long running ‘real time’ topic of my solar powered ‘tracker’ setup.

For years I have been mulling over the idea of putting a solar powered (no power on the roof) setup on the roof of our office building. It has a pretty nice outlook and I have always wondered about how it might perform as much as how I might go about building a 24 * 7 * 365 setup.

My son finally pushed my buttons and forced me into some action a few weeks back.
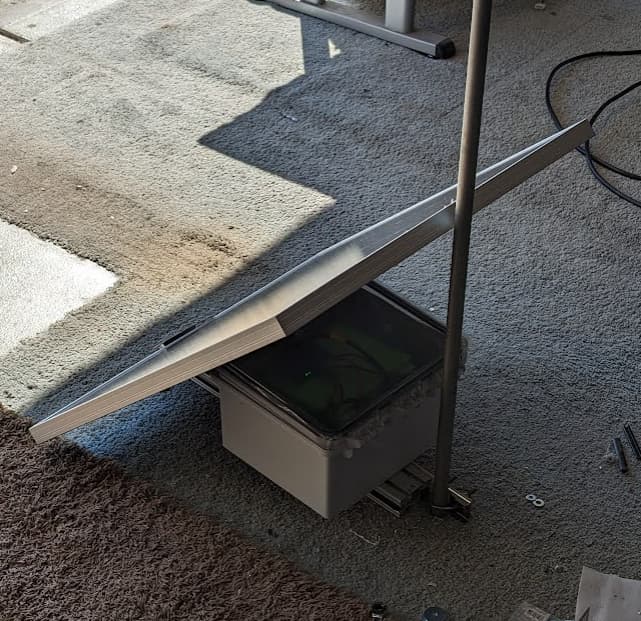
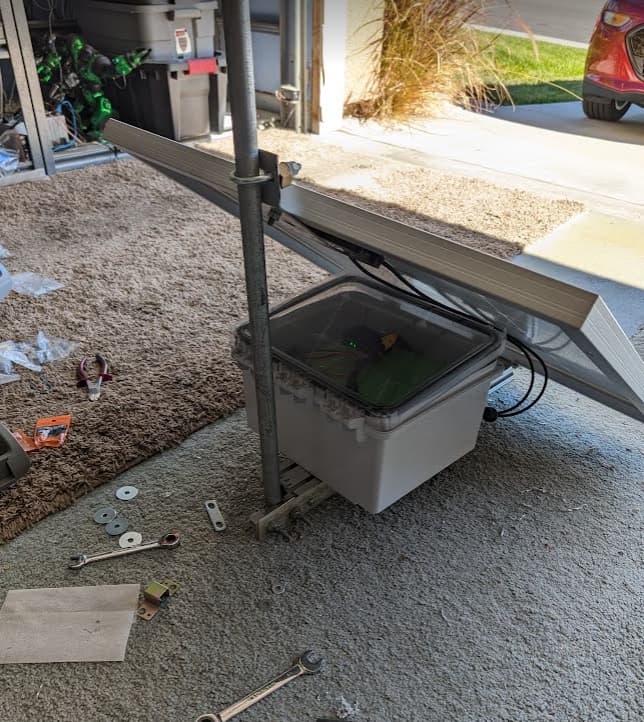
First, quick and dirty test…

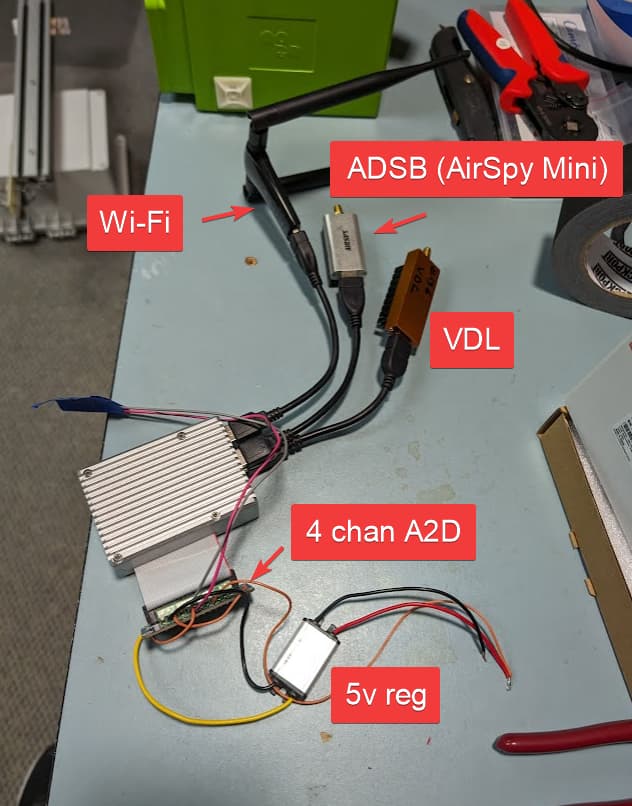
Since there is no power on the roof and no way to run an Ethernet cable we have to go Wi-Fi. The Pi Wi-Fi is beyond horrible and I did not have time to muck about building USB Wi-Fi stick drivers from source for a quick and dirty proof of concept test, so I went the hardware hack route to get some Wi-Fi on a Pi that would pickup our office SSID while on the roof…

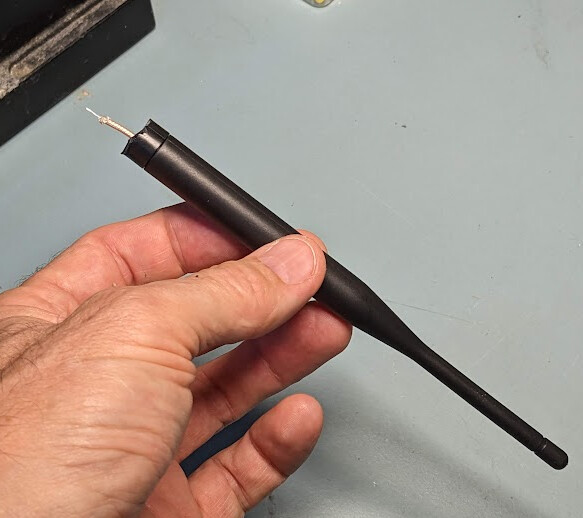
I just hacked off the SMA adaptor of an old Wi-Fi antenna I had laying around.

Next up, prepare the Pi.

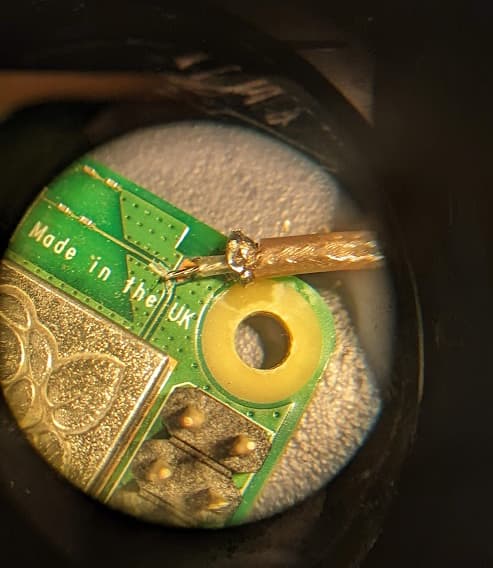
Solder the antenna coax to the Pi PCB.
It helps to have some magnification here as center of the antenna does not have a lot of space and can easily short out on the ground plane.

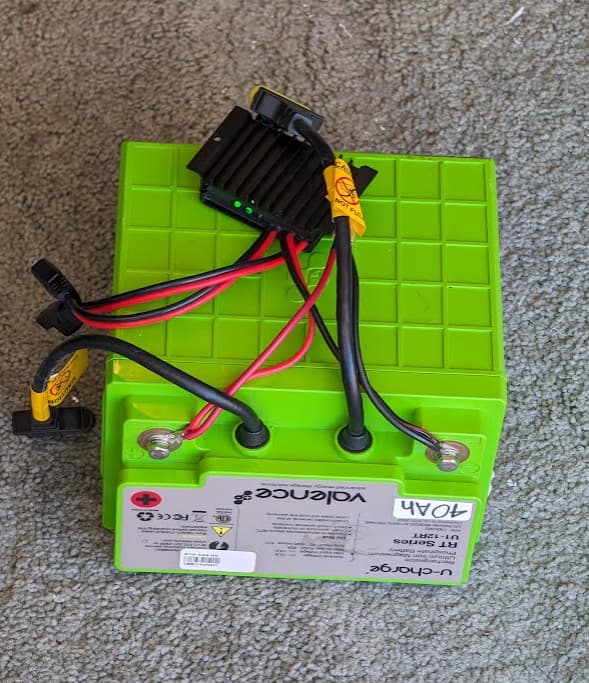
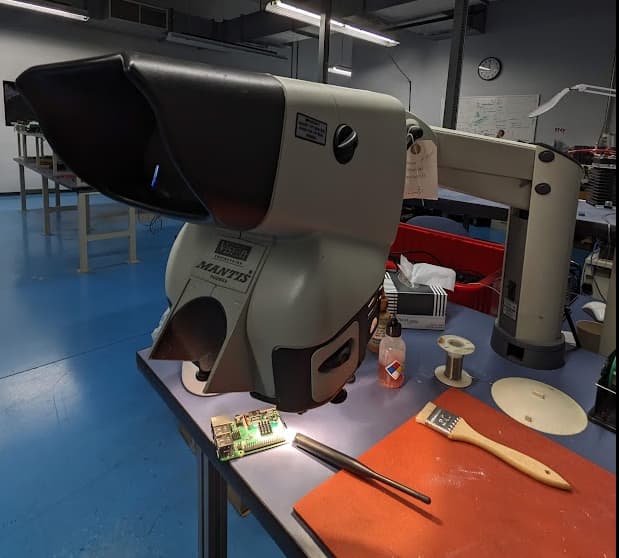
Our company makes hardware, so I have access to some nice gear…

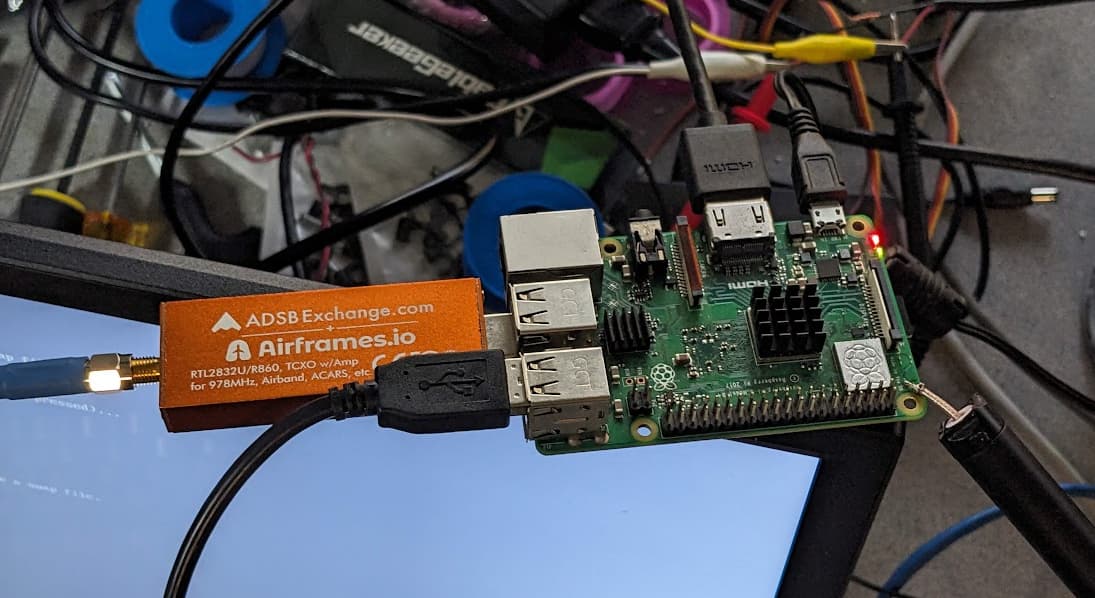
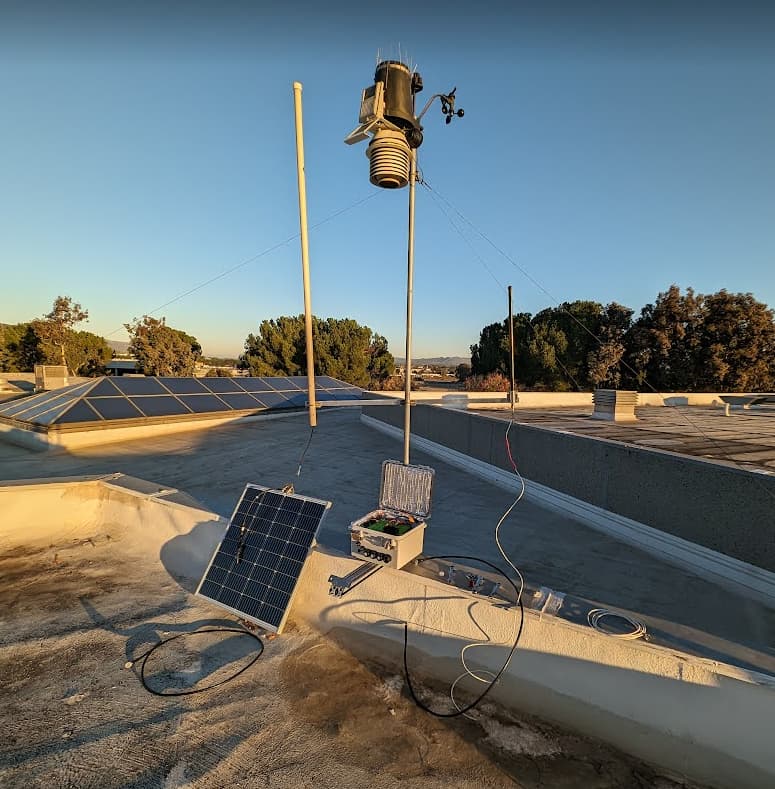
Now that we have good Wi-Fi, a quick build of dumpvdl and Node-RED we can head onto the roof and test things out…

We only had a spare dpd Airband indoor antenna, but it was enough for a test.
My son is checking the messages on his phone via the Node-RED interface. More about that interface in a week or so I suspect.

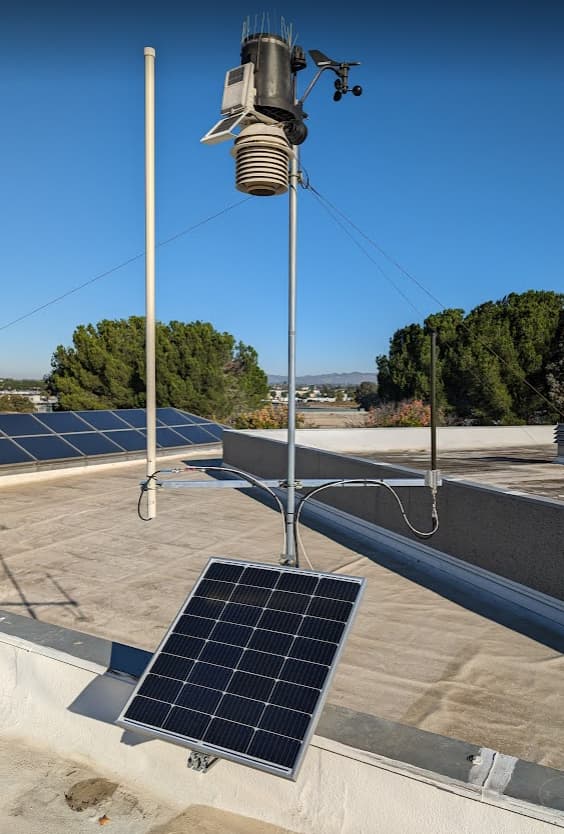
The thing to note with this photo is the background, you can see why I wanted to test out an antenna up there, its pretty nice view up and down the valley.
The west out to the ocean is going to be hopeless and I’m Ok with that. I know from my home setup that I can hear the ACARS messages from the aircraft coming in from the ocean just fine given their altitude.

image

(Decoding lat/long positions from those VDL messages that include it and plotting them on the worldmap node)
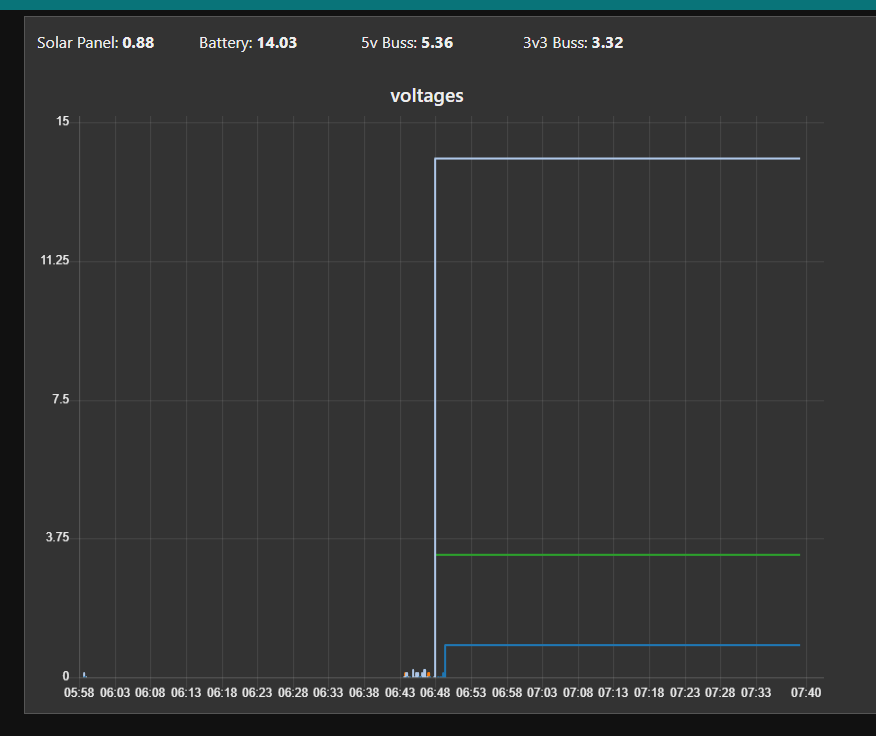
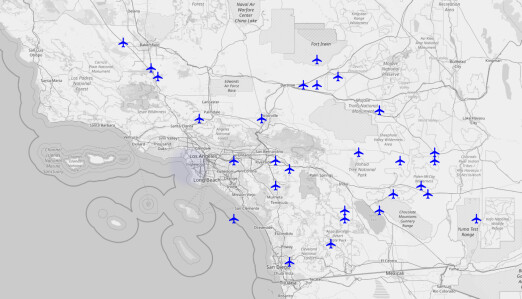
I’m very happy with the coverage after the first hour.
Solid range in the expected 3 directions. Much better than my home setup just a few miles away.
I think I have satisfactorily answered the question. Yes. It will be worth the time and money to build this thing.

1 Like

First step in the ‘real build’ is to pick a base image to build it on.
Since I don’t do a lot of ADSB I figured that would be the first place to start and I wanted something that I could not worry about and allow me to focus on other parts of the build.

Since I wanted to feed a few ADSB sites, I thought that adsb.im would be a good start. Never used it before, so figured it would be a good time to test it out. Honestly, the checkbox feeder approach also sounded appealing.

I lost a lot of time trying to install it on a Pi3, it turned out that the model Pi3 I was using is not supported, so if going with this method, be careful about the SBC you pick. The Pi4 worked fine.
The docs and support for this build are deliberately sparse as to not overwhelm a new user, for example adding the PlaneFinder option is currently not supported and getting help to add it seems missing.
The DietPi build of this setup is complicated to work with in SSH, so keep that in mind if you plan to add on extra software like Node-RED. The non Diet builds will be smoother to work with in shell.

I strongly considered trying out the SDR-Enthusiasts image. It has both ADSB and I think ACARS stuff built in but the docker learning curve seemed to go against what I wanted to achieve with this build. Also I was not sure how they went about sharing the ACARS data and did not want to end up in a dead end docker in that regard.
In short, high learning curve with an unknown outcome with that option so I did not test it.

Next up I thought I would build on the adsbexchange image.
For some unknown reason, even after burning the image a few times and trying two different Pis, the best menu I could come up with looked like this:

image

I just wanted something quick and did not want to faff about in 2 different config files that I forget the names and locations of to get the thing running. Also the Grafana stuff seemed to add a pretty high CPU use load for nothing beyond some odd eye candy… I just wanted a light weight ADSB image…

Third (forth?) option I tired was airplanes.live. While it gave a fuller menu than adsbexchange, adding other feeds to other sites is a Linux command line mess.

Bottom line, ADSB just like ACARS is a bit of a ‘pick your poison’ with no current ‘one size fits all’, but there is clearly a lot of effort going into both systems to improve that initial install experience.

1 Like

Next up, Wifi.
Its 2023, so a USB wifi dongle on a Pi will be easy right?
Not so much.
I have no idea why, but I think they just expect everyone to use the on board wifi and nothing else. Trouble is, the range is about 5 feet at best, and once you put a good metal heat sink case on, the range drops to inches.

So, here we are. I think the build process is going to vary based on what Wifi dongle you chose, so do some up front reading before you part with your cash.

I found one that had a pretty good Github walk through on building the drivers.
Trouble is, it needed the Linux Kernel and at some point in the past year the Pi guys forked something and so the install script was complaining that it could not find them on the disk (trust me, they were there), but the odd work around (after too much Google Foo) is to simply add ARM_64bit=0 to the /boot/config.txt

Once I did that, the drivers built and adding the SSID and password to the usual supplicant file (sudo nano /etc/wpa_supplicant/wpa_supplicant.conf) had me up and running… Oh, and you need to add ‘auto wlan1’ to the sudo nano /etc/network/interfaces file or it wont come up after a reboot…

Ahhhh Raspberry Pi in 2023, making computer tech so easy for the home hobbyist. NOT!

1 Like

Next up, solar monitor.

I just needed a way to read, at the very least, the battery voltage in Node-RED.
There are a few A2D (analog to digital) converters for the Pi. I wanted more than one and I wanted a pretty small tight form factor so went with the 4 channel Waveshare.

Not sure I need to measure current, but it was nice it has that option.
It fits sort of backwards on the Pi (screw terminals are inside the case in the middle of the Pi), so I had to use a short ribbon cable to move it outside the case.

Not a big problem, but worth noteing.

Powering up the pi and installing Node-RED using the usual script I quickly found an issue… The Wave share has addressed the 4 x INA219 converter chips (they use the i2c interface) sequentially but the Node-RED node for it has hard coded the addressing to match the single unit INA219’s like you find at Adafruit where their addresses are set by jumpers.

In short, single INAs go 40, 41, 44 and 45.
The Wavehsare are 40, 41, 42, 43. (Hex).

You can confirm what you have by installing sudo apt install i2c-tools then run i2cdetect -y 1 and you should see your i2c devices like thus:

image

First up, install the INA219 node by adding it to the pallet in Node-RED (Tip, just search for ‘ina219’, its the only node listed).
BEFORE you place the node and deploy, you need to edit two files and restart node-red.

nano /home/pi/.node-red/node_modules/node-red-contrib-easybotics-ina219-sensor/ina.html

and

nano /home/pi/.node-red/node_modules/easybotics-ina219/ina219.js

First up, the html file:

Change the text in the red box to match the waveshare addressing.
Note you can change the white names, but its not really used in Node-RED anywhere interesting, so I left it one-to-one hex addressing naming.

Save and exit.

Next the .js file

Change the addresses in the red box.
Save and exit.
Restart Node-RED: sudo systemctl restart nodered.service
Ok, now you can place your nodes and hook them up.
Unless you need fast (tip, you don’t) poll rates slow things down a bit, I have about 15 seconds, batteries cant charge that fast!

My rough flow looks like this at this early stage…

The resulting boring graph with the unit sitting on the test bench…

I suspect it will become more interesting once its on the roof and the day night cycle kicks in.

Regardless of how it looks at this point, it working as expected.

And with that, we have the core parts of the tracker built, working and ready for the more physical aspects.

1 Like

Hook the battery to the solar regulator first.
This is pretty standard fare as they auto detect the battery and if you just hook up the solar panel first, they get a little nuts (and some let the smoke out).
So, battery to reg.

Once that is done, the rest is pretty smooth sailing.
Put some bubble wrap in the box for a bit of thermal something. Really its just keeping the sun out of the lid, probably is not helping much, but is not hurting.

The box bolts onto the base and a mock up pole helps get things setup in the garage like it will be on the roof.

U bolt at the bottom and need to make a bracket for the top of the panel to also hold the pole.

The Pi setup ready to drop in the box.

On the morning of the install, only one hot air balloon around.

Getting the distances roughed out.
Only need a bit of height on the antennas since we are already up a bit and a few more feed won’t make much difference.

Not happy with the box layout.
If we chose to go ahead with the install I will be revisiting this for sure.

Up and running.
Amazon LNA on the ADSB and gpio labs ACARS filter LNA on the PDP airband antenna.

1 Like

What is the total cost for something like this? Have some thoughts here @thebaldgeek ?

Great question.
I could break out the BOM and see what it comes to.
I had a lot of it laying around from old projects, so did not have to buy it all from new.
I also have a great E-waste store close by…

1 Like

I think an ideal BOM would be great for folks looking to recreate or get an estimate of total equipment/costs!

BOM of the major parts.
USA Amazon links (sorry, you should be able to convert them to your area).
Also not in any real order, feel free to post here and ask any questions about why this part or that part.

$15 each. $30 total 2 x 6 foot coax. Probably should have gone longer, they are a bit short. 8ft or 10 ft would have been better.

$29.99. 4 channel analog to digital current/voltage Pi Hat.

$8.99 12v to 5v DC-DC converter.

$20.99 Solar regulator. I would have loved to use a MPPT, but cost and voltages did not align.

$64.99 100w solar panel. Note the Pi4 and SDRs draw more than you expect (10w in my case), depending on where you live you may need more solar. Also the size the battery should be carefully calculated - or do what I did and go massive overkill. Also note most solar panels are measured in Alaska in deep winter with Southern California summer sunshine. In other words, you will never get their rated output very often. So de-rate accordingly.

$60.00 40Ah battery from local E-Waste store.

$??.?? Box

$??.?? Scrap aluminum and U-Bolts.

$140 PDP ACARS antenna. The gold standard for all things air band be it voice, ACARS or VDL.

$60 ADSB antenna. This is not the one I used, but is the same length and is single frequency (most these days are 1090 and 978. I have zero UAT traffic here, so don’t need or want that in the mix).

$13.31 ADSB LNA. I’m very happy with this little filter & LNA beyond the fact that the USB-C power connector sticks out the side. I soldered two wires to the main regulator input / ground and fed it with external +5v DC. It does not accept Bias-T. Can’t be beat for the price.

$78 Air Band filtered LNA. Mixed feelings about this one. Its expensive, but does seem to work.

BOM total from here is roughly $455.
My cost was around $140 as I had most of the parts either laying around as spares or stuff I took down from the roof of my house, ie my in use KRIV ACARS station and moved to the factory roof.

1 Like